Spotting good root structure is the first line of defense against root rot and other soil problems. Many growers learn that over-watering is the top cause of decay, but fungi like Pythium and Phytophthora also play a major role. Quick identification helps them save plant life before damage spreads.
When someone inspects a pot, they should look for firm, pale strands and avoid slimy, dark mass that signals rot. Early symptoms include soft stems, stalled growth, and foul soil odors. Acting fast to fix root rot improves recovery odds.
Proper watering habits and clean soil management are essential. They do not guarantee immunity, but they reduce risk. Learning the right ways to check a plant and amend soil will help any gardener protect their collection.
Key takeaways: Recognize early signs root rot, act quickly to save plant, and combine good watering with soil care to prevent root rot.
Understanding the Anatomy of Healthy Roots Indoor Plants
A quick glance at a pulled root ball reveals whether the system is functioning or failing. This section explains what to look for and why oxygen matters below the surface.
Visual Characteristics
Firm, cream-white threads signal a working plant root system. They feel sturdy and resist easy snapping.
By contrast, soft, dark, or slimy tissue points to rot. Leaves may yellow and growth will slow when decay spreads.
- Firm, cream-white appearance indicates good nutrient uptake.
- Sturdy structure supports steady growth and visible leaf vigor.
- Dark, mushy tissue usually means root rot has begun.
The Role of Oxygen
Roots need oxygen to function. When soil stays saturated with excess water, oxygen levels fall and cells start to die.
Proper drainage and a quality potting mix keep air pockets in the soil. Those pockets prevent rot and help the system absorb nutrients efficiently.
Identifying the Early Warning Signs of Root Decay
“A subtle shift in growth rate or leaf tone is often the first hint that rot has begun below ground.”
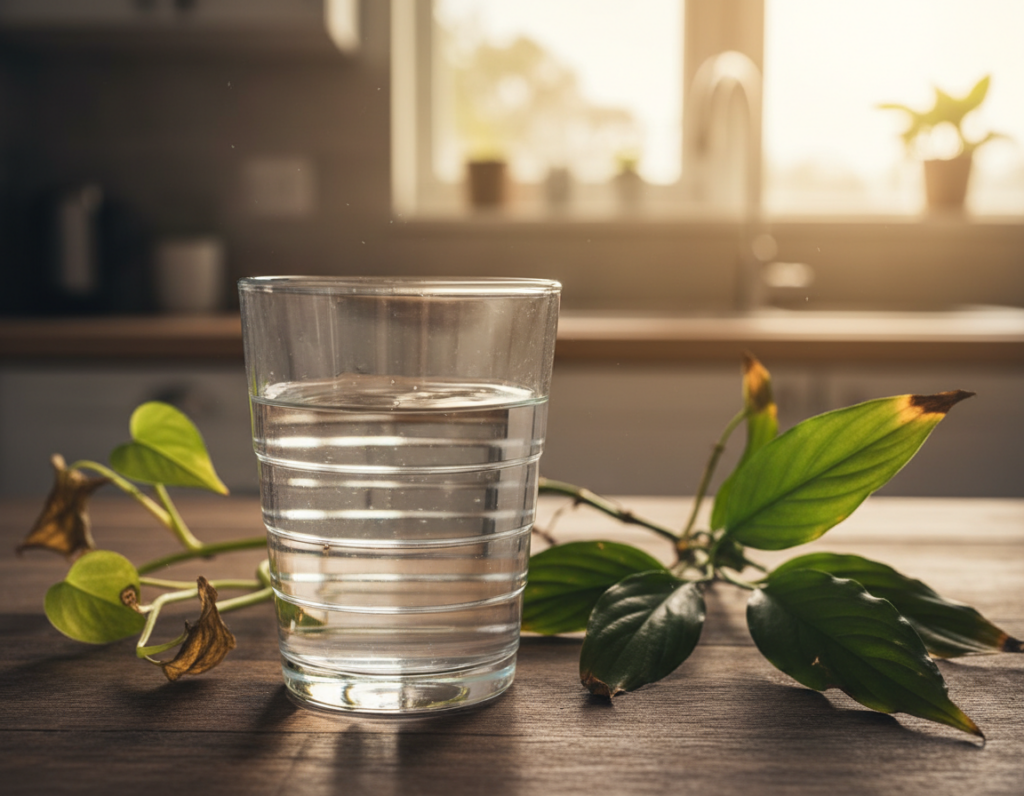
Yellowing or drooping leaves are common signs that the root system cannot supply nutrients. A plant that wilts despite regular watering often has failing roots.
If an unpleasant, rotting odor appears after you water a pot, that smell is a strong indicator of root rot in the soil. That scent usually means decay is advanced and requires action.
Slow or stunted growth is easy to miss but is often the first visible symptom of decay. Regular care and inspection make it easier to spot this early.
- Slow growth and leaf yellowing point to struggling roots.
- Excess water and prolonged moisture raise the risk of rot.
- Wilting despite watering signals severe root failure.
- A foul odor after watering confirms active rot in the soil.
Early detection of signs root rot allows prompt treatment and a better chance to save the plant.
How to Properly Inspect Your Plant Roots
Careful removal of the plant from its pot gives the clearest picture of what is happening below the soil line.
Gently lift the specimen and lightly shake or tap away loose soil. Use an old towel to contain the mess and protect surfaces while you inspect the root system.
The Importance of Smell
Smell is a fast diagnostic tool. If the soil or root mass gives off a rotten-egg odor, that foul scent usually means rot has advanced and needs immediate work.
“If you smell a foul odor, it is a confirmation that the root rot has progressed and requires urgent intervention.”
- When you remove plant specimens from their containers, make sure to use an old towel to contain the mess.
- Healthy roots should feel firm and look cream-white; roots affected by root rot feel soft, mushy, and often smell like rotten eggs.
- Always use pots with drainage holes so excess water can escape; good drainage is one of the best tips for root health.
- Inspect the soil and the plant pot to confirm whether the plant is suffering from root rot.
If roots appear dark or slimy, act quickly. Trim decayed sections with a clean knife or scissors to avoid spreading bacteria.
Make sure your potting mix allows for airflow and that drainage is working: both prevent prolonged saturation that invites rot.
For a detailed repotting checklist and next steps, see the repotting checklist.
Essential Steps for Treating Damaged Root Systems
Treating a damaged root system starts with calm, methodical steps that remove infection and restore balance. Early work reduces stress and gives the specimen the best chance to recover.
Sterilizing Your Tools
Clean shears and knives before any cut. Use rubbing alcohol or a bleach solution to kill pathogens.
Sterilization prevents transfer of rot from one plant to another and is the first defense in this process.
Trimming Affected Areas
Gently wash the mass in lukewarm water to reveal rotting roots and soil symptoms. Remove all mushy or dark tissue with sterilized shears.
“If you remove half of the roots, prune about half of the top growth to rebalance water and nutrients.”
After trimming, repot into a clean pot with fresh potting mix and ensure good drainage. Applying a systemic fungicide, such as Buxus Blight where approved, can help protect remaining root tissue.
Taking Insurance Cuttings
Take cuttings of healthy shoots before extensive surgery. This is a reliable way to save plant genetics if the mother fails.
When in doubt, use patience and precision. For a step-by-step checklist and repotting tools, see the repotting guide.
- Use sterilized shears to cut away all rotting root tissue.
- Wash roots in lukewarm water to find remaining symptoms of rot.
- Use a clean pot and fresh soil; apply fungicide after trimming if needed.
Best Practices for Repotting After Root Surgery
Repotting after root surgery is a chance to eliminate pathogens and rebuild a balanced soil environment.
Sterilize or replace the pot. Use a new container or treat the old one with 3% hydrogen peroxide to kill lingering root rot spores. This reduces the chance of reinfection.
Choose a free-draining potting mix. A gritty mix helps water drain and prevents prolonged saturation. Proper drainage holes are essential so water drain can occur naturally.
- Downsize the pot when much of the mass was removed; a slightly smaller pot holds less moisture.
- Use fresh soil only; reused media can reintroduce rot.
- Clean any reused saucer so pooled water does not create a wet zone beneath the plant pot.
“After trimming rotting roots, repot into dry media and monitor moisture closely as the system recovers.”
Finally, monitor the specimen closely. New growth takes time, and frequent checks for moisture and early signs of rot will protect the recovery. For a step-by-step repotting guide, see the repotting guide.
Proactive Strategies to Prevent Future Root Rot
Simple adjustments to drainage and airflow cut the risk of rot long before symptoms appear. A few changes to soil, pot choice, and care routine make a big difference.
Optimizing Soil Drainage
Choose a free-draining potting mix that includes coarse components like perlite or bark. This keeps air in the soil and lets excess water move away from the plant root zone.
Avoid over-watering and always use pots with drainage holes. Do not let a saucer hold standing water; empty it after watering.
- Increase airflow and light so the soil dries faster and lowers rot risk.
- Use sticky traps or Mozzie Bits to catch fungus gnats that spread root rot.
- Use a moisture meter to time watering and reduce excess water in the potting mix.
- Downsize a pot if most of the mass was removed; smaller pots hold less moisture.
“Proper drainage and pest control are the most reliable ways to prevent root rot.”
Conclusion
Recognizing smell, wilting, and slowed growth lets a grower stop rot before it spreads. Watching for these signs helps diagnose root rot early and limits damage to the root network.
Act quickly, to fix root rot and to fix root issues that threaten a plant. Quick trimming, clean repotting, and targeted care can often save plant material and revive vigor.
Prevent root rot by improving drainage and moderating watering. Regular checks and simple care steps protect long-term health and help prevent root problems in indoor plants.